Thursday, June 28, 2012

Puzzle Nails

Hi there!

Lately I had the chance to discover all the kindness and the cuteness of the Queen of Mojitos, also known as  @MojitoBeauty! I knew her blog, but didn't even imagine how nice she was! Her blog is in french but you should really visit it :)

So today I wanted to show you something I've been wanting to try for a while : Puzzle Nails. I love puzzles! Some people think that assembling the little pieces of a puzzle is only a waste of time, but I looove doing puzzles!
Therefore, I wanted to try to make puzzle pieces on my nails. I'm not at home so I made it with my two A England colors which are Saint George and Avalon.


The most difficult part was to do the little black marks to define the puzzle pieces with a nail art pen.
I really like it, and I'm sure gonna try it with more contrasting colors. What do you think about it? Would you wear this on your nails?
The weekend is almost there! Only two days to go!

xoxo

Tuesday, June 26, 2012

Dots & Dots


Hi there!

Today, I'm on holiday and tomorrow is my birthdayyyy yeay can't wait :D
For the manicure I'm going to show you, I got my inspiration from ChalkBoard Nails alias Sarah. I love every single thing she does, and she has awesome nails. Gosh I'd like to have such nails!
So here's the mani I'm talking about :


My goal wasn't to do something completely similar, but I liked the way she overlayed the dots and that's what I wanted to do. I used OPI Did it on em as my base color. Frankly, this is not a color I would wear alone on my nails. I did the dots with Models Own's Fuzzy Peach and OPI's Lady in Black. And here are the pictures :


I only regret not having longer nails for this design!! And for those of you who are reading my blog, and are maybe thinking that my right hand is missing here it is :


My designs are always achieved on both hands, but I prefer my left hand which is logical as I'm right-handed! That's why you'll mostly see pictures of my left hand!

See you soon!

Sunday, June 24, 2012

The Sunday Nail Battle - Clouds VS Rainbows


Hi there!

Today is Sunday and therefore it's time for The Sunday Nail Battle!


This week, 10tubes and Odile Sacoche, came with a theme that's going to lead to a real battle : Clouds VS Rainbows. The deal is to use at least 3 colors to achieve the manicure.
When the theme came out on Tuesday, I already knew which side I was going to chose : Rainboooows!
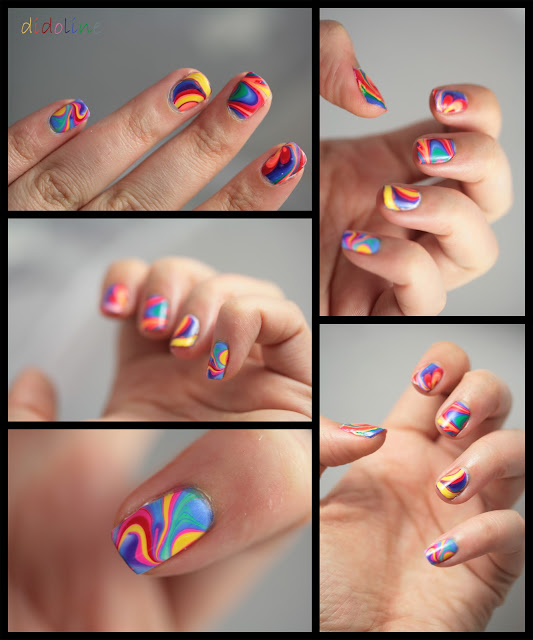
I hesitated between doing something based on striping tape or water marble. And I eventually went for water marble ..! Also if you've never tried it, I did a tutorial here on how to achieve a nice water marble :) 


I used 9 colors above to achieve the following manicure :


I love the result. I wouldn't wear it for work, but for summer time (even if it doesn't look like summer here) this kind of mani is perfect! I love how psychedelic it looks and it makes me want to scream RAINBOW POWAA :D

What do you think about it? Are you clouds or rainbows? Can't wait to see what side the other girls chose!
<3

Saturday, June 23, 2012

A England - Saint George


Yesterday, I had to work at one of our customer's office, so I had to have classy nails.
In my last order on Bec & Ongles there were some A England nail polishes I was waiting for!
But let me tell you about my new base first. It's not a new product, but I bought it only a few weeks ago. It's OPI Ridge Filler. Once you apply this base on your nails, you'll immediately notice the difference. It gives your nails an uniform surface, on which you can apply whatever nail polish you want. I've been trying it with different brands and each time, the polishes I applied over it stuck to my nail like never before. I love it and I advise you to give it a try!


Let's now talk about the polish I've been waiting for which is Saint George from A England. I have an OPI which looks almost the same, but there's not comparison to make here. Saint George is way more pigmented, and has way more dimension. When you put your nails in the sun, you're just sparkling, really!!
But no more talking let's see the pictures :


I've seen pictures from Odile Sacoche which made me want to get Tristam from the same brand! I already have Avalon which is a magnificient purple that I'll show later ;) 
Did you try these A England nail polishes?? What did you think about it? Are there any colors you would advise me to buy?

Wednesday, June 20, 2012

Bundle Monster - 2012 New Set of Stamping Plates


Hi there!

I'm just writing this quick post to tell those of you who are addicted to stamping, that Bundle Monster has launched its third set of 25 stamping plates on their website : Bundle Monster !


The 25pc set costs 21,99$ and the shipping fees depend on the country where you want them to be shipped.
For instance, shipping to France will only cost 4$.

So here's what they look like (the pics are from their website) :


And here are the detailed views :


Are you going to order this set? Or have you already placed your order?
Do you think that I've already placed my order? :D

Tutorial - Water Marble

Here is my first tutorial on Water Marbling. I tried my best to explain through pictures the big steps to achieve a nice water marble design on your nails.
For this tutorial, I'm only going to use 2 colors : a bright pink and a purple. For water marbling, I only use cheap nail polishes.

Let's begin!


Step 1 : First, start with your base color. I usually do a white base. Sometimes, I take one of the colors of the marbling as a base and that's what I've done here. So I did a pink base. You can add a coat of fast drying top coat, it's as you like. I did one. 


Step 2 : Prepare your tools. Try to put together everything you'll need because you don't want to mess your designs once you've started! I always have two cups filled with water (one for backup :D), some orange sticks and some Q-tips. I also put some paper towel under my filled cups so there won't be any mess around!  You also should prepare your polishes and open them, it'll help you go faster in the next steps.


Step 3 : Prepare your hands and your nails. Wrapping your fingers with scotch tape will ease the cleaning step. I put a first piece of tape around my finger along the roots of my nails, and one other piece around the sides of my nails but also under my nails. Looking sexy, right? :D 


Step 4 : You can start dropping the colors. You should test your polishes prior to starting a water marble, just to see those which will work, and those which won't. You'll also see how fast they dry once on the water. I bought these 2 polishes for only a few dollars each and they're dedicated for water marbling. 


Step 5 : To create your design use an orange stick. Do not start from the first circle, always start from the second of the third one. It'll keep you from destroying your design. Lightly drag the polish into the design you want. Always clean your orange stick before dragging again, or you may have some rally unpleasant results. The little excess of polish that gets on the stick can mess your design.


Step 6 : You can now dip your finger into the water. Try to put your nail as horizontally as possible before dipping it into the water. 


Step 7 : With your other hand, grab a Q-tip and remove the excess of polish that's left on the surface of the water. By doing this, you won't ruin the design printed on your nails when guetting your nails out of the water.


Here's my first finger :


Step 8 : You can now repeat steps 4 and 5 and dip your second nails into the water.


Second nail achieved!


Step 9 : You can also dip two or three fingers together. As long as you dip them horizontally, and that you have the design you want, you will get something nice.


Step 10 : You can now repeat steps 4 and 5 and dip your thumb into the water. You should always do your thumb alone, it's easier. 


Step 11 : You can now remove all the tape. Be careful to not remove some of the design while removing the tape! Be gentle!


Step 12 : Let's clean! As you can see, there's not much left to be cleaned. You can now finish with a top coat.


And here's the final result :


What do you thing about it? Are you going to try it if you haven't already?
If you need further information, don't hesitate, I may have forgotten some details :)

Have a nice day <3

Sunday, June 17, 2012

The Sunday Nail Battle - Snow White


So here I am for what became the traditional sunday routine, The Sunday Nail Battle!!

This week's theme is Snow White and it was chosen by OdileSacoche and 10tubes, authors of this concept :)


What I like about this sunday battle, is that each week, we have to think about what we're going to suggest.
When I think about Snow White it reminds me a lot of things from my childhood. But it also reminds me of the magical world of Disney, which I love. Did you notice how life seems so peaceful, how people are so happy when they're at Disneyland ? Magic!
So back to the battle!! I started with a white base. Then I took a black felt-tip pen and draw what looks like the silhouette of Snow White. I've seen something similar on the web and I love it! Then, I took OPI's Big Apple Red, circumstantially perfect, and with a dotting tool I added an apple and some details.


Then as Snow White's silhouette was nice in black, I chose to do some of her dress detailing on my blank nails. And here's the result :


What do you think about it? 
As we're talking about Snow White, I wanted to know if some of you went to see Snow White and the Huntsman. I wanted to see it until I heard it got pretty bad reviews ... I've already seen and liked movies that  got bad reviews but would you advise me to see it anyway?

Have a nice sunday ! <3

Friday, June 15, 2012

OPI - Black Spotted


Hi :)

Did you hear about this Black Spotted polish from OPI? It hasn't been released everywhere but here in France we have it !! For once we have something that's cool and exclusive! So glad!
I bought mine from Sephora's website as I didn't manage to find it in stores...


When I swatched it for the first time, I had mixed feelings. I didn't know if I was liking to like it or not.
My first advice to you is to properly select the base you're going to use before applying it. If you want something discrete go for a dark colored base, but if you want the little spotted designs to show, go for a light and shiny base.

This polish, contrary to the Black Shatter from the same brand, is very fluid and is very easy to apply. It's also easy to apply a really thin coat. As written on the little note which goes with the polish : "Apply a VERY THIN coat over completely dry lacquer. Finish with Top Coat". And really the thinner the coat will be, better the result will be. I tried it with I'm Not Really A Waitress as a base :


As I wasn't convinced with the result, I tried to try it with Good As Gold from Essie. 
And this time not only I loved it, but I realized how much potential it has! I can't tell you how much I like this new polish! I'm definitely going to swatch it on different bases, and I'll show you the pictures, just to see what goes with this magic thing!


I like it better than the shatter one. What do you think about it? Are you going to buy it when it is available? For those of you who could buy it, did you like it? From what I know, unfortunately, it won't be available in the US...

I'll be back soon :) 

Wednesday, June 13, 2012

Essie - Mirror Metallics


As I told you on sunday, I was really inspired by the triangle nails thing. 
I recently bought two polishes from Essie's collection Mirror Metallics. I don't know about you, but personnally, I was only attracted to Nothing Else Metals and Good as Gold. I don't really like the other ones. When I went to the store to get them I swatched the other colors from the collection, but my first feeling was totally the good one. So I bought the two colors I wanted =)
The first polish I wanted to play with is the Nothing Else Metals one, with it's pinkish reflects. 
I hesitated between doing some stamping, or something triangle related, and I chose triangles!

I don't regret buying them at all. They're really easy to apply, and they're opaque with only one coat. As always, I did two coats, but I didn't need it!
They're so pigmented that I'm sure they'll be great for stamping. This is definitely a good buy!!
Did you buy any of these colors? What are the ones you prefer?

xoxo 

Tuesday, June 12, 2012

Cubic Nails


I recently discovered that I had lost my M73 stamping plate. I don't think it's lost, I'm sure that my cat stole it from me to give his paws a nice stamped manicure while I'm at work! 
So I re-bought it on a french Konad retailer's website which is Bec & Ongles and where the prices are almost the same (cheaper in fact) as on Konad's website konadnailart.com. And no fake Konad on this site, guaranteed !


Here's the design I chose to stamp on my nails :


If Bec & Ongles doesn't ship to your country, do not hesitate to contact them, maybe they'll find a solution :) Currently they ship to France, Belgium, Luxembourg, Switzerland and Spain :)

And as I told you, I don't know why but I'm sure my cat can be held responsible for the missing plate!!


Monday, June 11, 2012

Fuzzy Peach


Hi girls!

How was your weekend? Mine was pretty cool, we went camping unexpectedly and it was awesome. The weather wasn't really nice but we did enjoy our trip!
In my last oder on LeDouxNuage, there was the Fuzzy Peach from Models Own. I was looking for a corally color and I totally fell for this one!
This color is really great, and it's opaque in 2 coats. I had to put 3 coats on my nails because my tips are really white and always appear under light polish colors.
I stamped it with a Bundle Monster stamping plate and some silver polish.


It's not completely perfect, but I like how the two colors combine together, and I really like this coral color.
By the way, if you know about other great corally like polishes, I'm opened for suggestions!! 

Have a nice day!

Sunday, June 10, 2012

The Sunday Nail Battle - Triangle Nails


How's your weekend going?

Today, like every sunday since 4 weeks, it's time for the Sunday Nail Battle.
The theme proposed by @10tubes and @OdileSacoche is "Triangle Nails".


Many ideas came to my mind, but the goal was not to overwhelm you with all of them. 
So I went for sometging really simple on a silver base :


A little zoom-in so you can see all the details (sorry the cleaning isn't perfect..)


I'm so impatient to see all the ideas the other girls came with!

See you on Monday!!

Friday, June 8, 2012

My Water Marbling Experience ...


Hi!

I think most of you girls have already seen this water marble thing on the internet. And I guess that like me you were astonished by some realizations ! I also didn't like some of them but that's my opinion ..
The first time I saw a water marble design I told myself that I had to give it a try! So I looked at tutorials and when I thought I had understood the technique I went for it.
So I took a little cup of water and I put my first drop. And nothing went like it was supposed to!!
My first try was catastrophic. A complete disaster!! My drops didn't expand on the water, when I tried to do the designs, everything was messed up... Gosh I was so furious!
But I'm stubborn, and I tried it again and again until I came with something I liked. It took me a long time to catch the technique!
So to achieve a nice water marble design, I advise you to be patient. Do it when you have time, because I can assure you that it can take more than an hour... My second advice is to use nail polishes that are liquid, and very fluid, it will work better. As you'll use many drops, don't use branded polishes, unless you really want to... And my last advice is to prep your fingers, to avoid a big mess. You can save your time with a good prep. What I do is that I put a little bit of cuticule oil on my cuticules and I tape my fingers so the polish doesn't stick to them.
To achieve this design, I did a white base and I used three colors for the marbling : a deep red, a pink, and a white polish. I put one drop of red then one of pink then one of white, I repeated this three times and then I took my stick to make the design. I didn't do one design per nail, I used one design for 3 to 4 nails. 


I think the result is nice and I've kept this mani for 2 days now, which for me is almost incredible !
I'd really like to know what you think about water marbling and if you'd like to see a tutorial where I'd be very precise on how I achieve a water marble design ... 

We're almost in weekend, so enjoy your day !! :)

Wednesday, June 6, 2012

Studded Nails


Hello there!

Recently, I've been buying a lot of things that I really wanted. I felt a little guilty at first but hey we have to be honest here, it feels so good to have new things :D
I don't buy nail things just tu use them once and never touch them again. No, I've got phases in which I'll use a product more than another one, but I always try to use everything I have.
So I already told you about these 1 Second Bourjois nail polishes than I've been crazy about. Two of my favorite colors are "Figue Chic" and "Rose Cupcake". I've been looking for these colors forever!
I also found in my drawers studs that I had bought a while ago. I'm more into studs than into strass and bling things. But when it's well done, strass can add a pop to your mani :)
My studs are from the BornPrettyStore. This online store is awesome : everything is quite cheap, shipping is free worldwide! I've already bought many items from this store and I've never been disappointed. Fast shipping, fast delivery, great products, everything I like!! For your next order, I've got a 5% off coupon : BPS5 ! Feel free to use it!
I didn't use any glue to make the studs stick to my nail. What I did is I put 2 coats of the color I wanted, I waited for it to dry, and once dried, I added a thirth coat, and this time I didn't wait for it do dry. Once the polish applied, I immediatly placed the studs. Then I applied two coats of top coat and here we go !


I've seen many studded manis over the net, and they all look great!

What about you? Do you prefer using strass or studs?

Bye!

Tuesday, June 5, 2012

Back To Basics - No Evil Eye Here!


Still no sun today, but I don't care because I'm in a really good mood!
I don't know if you've read it but I recently made a review on all the top coats that I own and that I've tested and one of the problems I happened to encounter with the Sèche Vite occurred today!
Sometimes, it seems like my polish shrinks at the top after I put the Sèche Vite on... And therefore the white tips of my nails appear a little bit... And after searching for it on the internet, I noticed that this problem happens quite often...
Anyway, today I was inspired by my bracelet, which is supposed to keep evil eyes away from me... And I believe it does! 
So I did something really simple based on OPI's The Color To Watch. I like the blueish reflects of this nail polish, but to get something quite opaque, you need to put at least three coats of this polish on your nails... So here's the result :


Sometimes, I think it's nice to keep things simple. I tend to always try to make my manicure stand out, but I also appreciate putting a simple coat of polish and letting it shine by itself!

What do you think about it? Do you also like doing something basic?

xoxo!